![]()
All product names, logos, and brands used in this post are property of their respective owners.
As you may know from one of my previous posts, I am a big fan of the multiOTP project (specifically, the multiOTP credential provider for Windows). It is one of the few (only?) free and open-source options for applying robust, scalable multifactor authentication (MFA) to Windows console and RDP logins. Do not be deceived by the “free” and “open source” aspects of multiOTP. It matches the capabilities of expensive (paid) 2-factor authentication solutions stride for stride.
I want to reiterate my thanks, kudos, and admiration to SysCo systèmes de communication sa for the countless, ongoing hours of development behind the project, and for making it available as open source.
Depending on your needs, you can deploy and run the multiOTP server (to centrally generate, manage, and validate MFA OTP credentials) to the Microsoft Azure App Service COMPLETELY FREE OF CHARGE! And because Azure App Service is a platform as a service (PaaS) offering, there are no servers or runtime environments to install or maintain - pretty sweet!
In this post, I will describe the process to install and configure the multiOTP server 5.8.x.x (with file-backed configuration, no database) as an Azure App using the free (F1) App Service Plan with PHP 7 on Linux.
Obtain the required multiOTP server files
Download the latest version of multiOTP from the multiOTP download site. At the time of writing, the latest was 5.8.2.9. The required file is multiotp_w.x.y.z.zip (where w.x.y.z is the version number - i.e. 5.8.2.9).
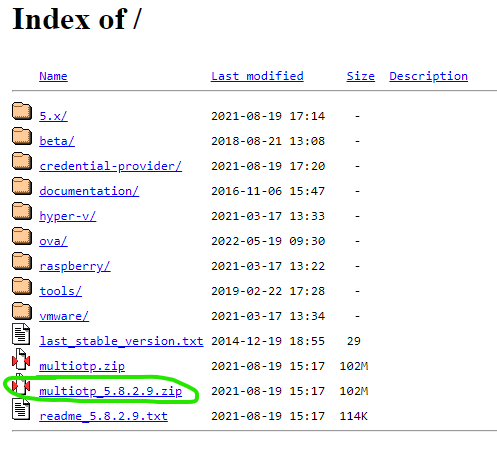
Unzip the file, and retrieve only the following files and folders (set them aside in another folder - you will need them later):
multiotp_w.x.y.z\linux\multiotp.server.php
multiotp_w.x.y.z\linux\templates
multiotp_w.x.y.z\linux\templates\template.html
Finally, rename multiotp.server.php to index.php.
Update the multiotp_etc_dir value in the multiOTP server code
As of multiOTP 5.0.4.6 (June 2017), the configuration file path (where multiOTP generates and stores its configuration, users, etc.) is hardcoded to be /etc/multiotp. That is fine on a full Linux server, but with the Azure App Service, the path does not exist (and cannot be created).
That being the case, I made a minor tweak to the multiOTP server code to point the configuration directory to /home/etc/multiotp instead. The /home path exists in Azure Apps, and the child path etc/multiotp can be created via FTPS.
In version 5.8.2.9, I made the following change to line 73,538 of multiotp.server.php (which is renamed to index.php if you are following along):
REPLACE: $multiotp_etc_dir = '/etc/multiotp';
WITH: $multiotp_etc_dir = '/home/etc/multiotp';
The line number may differ in different versions of multiOTP, but ultimately, you need to point the $multiotp_etc_dir variable to /home/etc/multiotp instead of /etc/multiotp.
Create the Azure App (and App Service Plan)
The next step is creating an Azure App and associated App Service Plan to run the multiOTP server in Azure. As noted, if you use the free plan (F1), there is no cost (but there are limitations - see App Service pricing). You will also need an Azure free account (or a funded Azure subscription if you have one).
Login to Azure, navigate to App Services, and click “Create”. Select a Subscription and Resource Group for the Web App, creating new ones if required.
Give the application a unique (preferably randomized) Name; for security (really obfuscation), I used “multiotp-” followed by a random GUID. The Name becomes your multiOTP server URL - in my example:
https://multiotp-6bfa298c-885d-4176-a393-055cabbc9df6.azurewebsites.net
Next, set the Code option for Publish, select PHP 7.4 as the Runtime stack, select Linux for Operating System, and choose an appropriate Region.
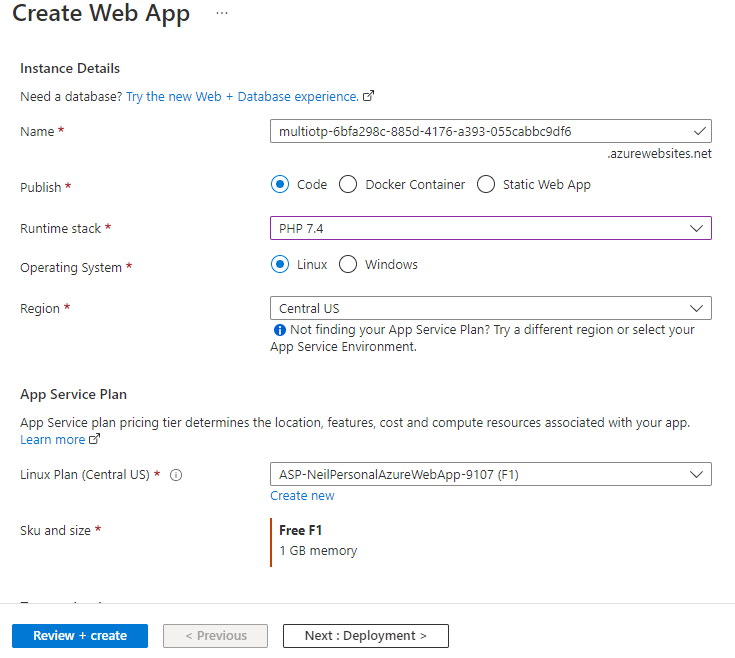
For the App Service Plan, create or select a “Free F1” plan. Depending on your requirements, you can seamlessly scale up the App Service Plan later.
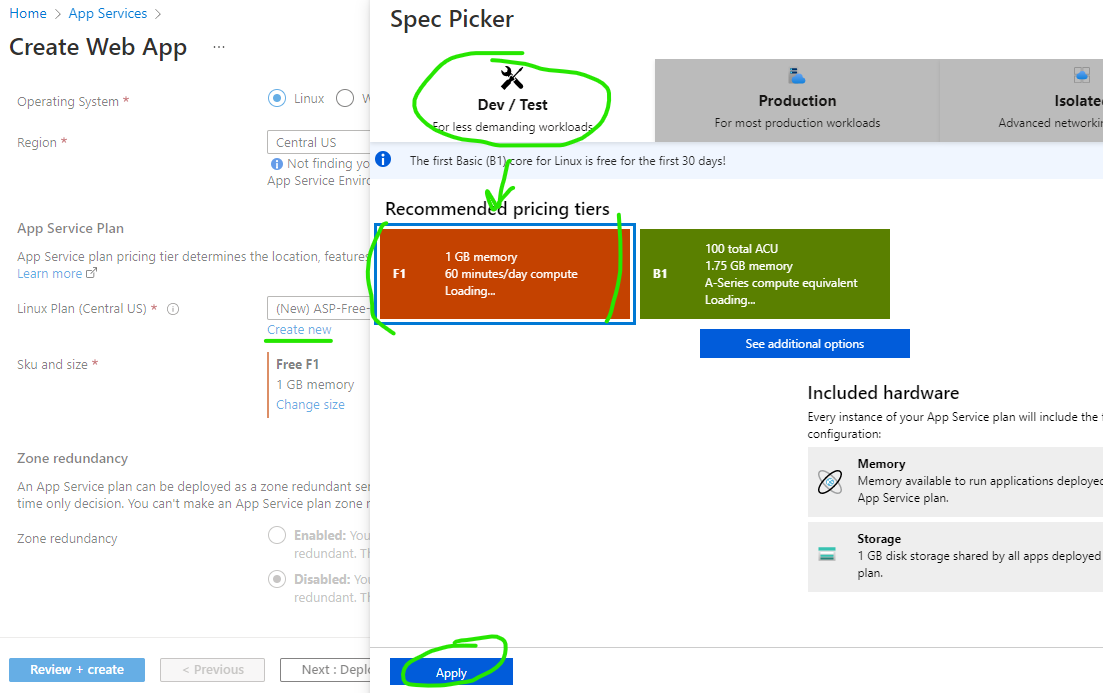
Once done, click Review + create and then Create to deploy the Azure resources.
Deploy multiOTP server to the Azure App
Deploying the multiOTP server is very easy, provided you completed the prework in the previous steps. Create a few folders and copy the required multiOTP files (previously extracted/renamed) into their respective locations in the App Service folder tree, and you are off to the races.
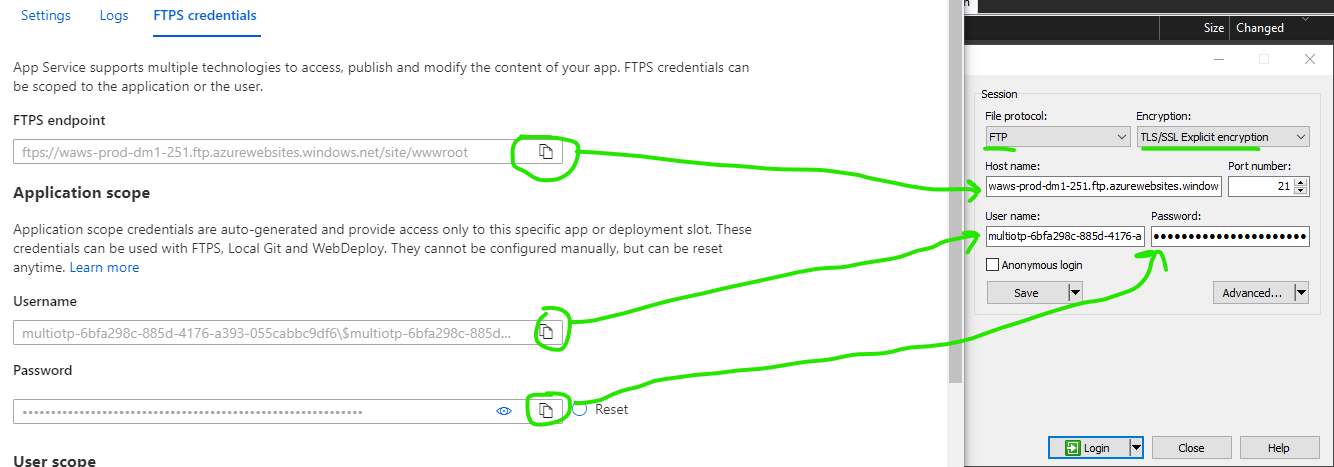
Manipulating files and folders in Azure App Service can be handled in multiple ways, but I selected FTPS (using WinSCP of course) for the sake of familiarity. The FTPS username and password for the App Service are found under App Services -> (select the name of your new multiOTP App Service) -> Deployment Center -> FTPS credentials.
Once connected, the default folder structure of the App Service appears in WinSCP as follows:
/
├─ ASP.NET/
│  ├─ DataProtection-Keys/
├─ Data/
│  ├─ DaaS/
│    ├─ Sessions/
│      ├─ Active/
│      ├─ Complete/
├─ LogFiles/
│  ├─ kudu/
│    ├─ deployment/
│    ├─ trace/
│  ├─ webssh/
├─ site/
│  ├─ deployments/
│    ├─ tools/
│  ├─ locks/
│  ├─ repository/
│  ├─ wwwroot/
Note that the FTP root points to /home on the Azure App Service filesystem. In other words, the root folder (/) you see in WinSCP is actually /home on the underlying filesystem.
Perform the following operations to deploy multiOTP server to the App Service:
- Create a new folder in the FTP root (/) called etc
- Create a new subfolder under /etc called multiotp
- Create a new subfolder under /site/wwwroot called templates
- Delete the default page hostingstart.html from /site/wwwroot
- Upload your copy of index.php (modified in the previous steps) to /site/wwwroot
- Upload template.html to /site/wwwroot/templates
Once done, the structure of your App Service file system should resemble the following:
/ ├─ ASP.NET/ │ ├─ DataProtection-Keys/ ├─ Data/ │ ├─ DaaS/ │ ├─ Sessions/ │ ├─ Active/ │ ├─ Complete/ ├─ etc/ ├─ multiotp/ ├─ LogFiles/ │ ├─ kudu/ │ ├─ deployment/ │ ├─ trace/ │ ├─ webssh/ ├─ site/ │ ├─ deployments/ │ ├─ tools/ │ ├─ locks/ │ ├─ repository/ │ ├─ wwwroot/ │ ├─hostingstart.html│ ├─ index.php │ ├─ templates/ │ ├─ template.html
After the required files and folders are in place, the multiOTP server is ready to run in the Azure App Service! It is worth noting that the first time you access multiOTP server in a browser (more below), it will automatically create additional, required files and folders under /etc/multiotp.
Reset the multiOTP server admin password and create a user
At this point, the multiOTP server should be up and running in the App Service. Browse to the App Service URL (from the App Service blade -> Overview in Azure):
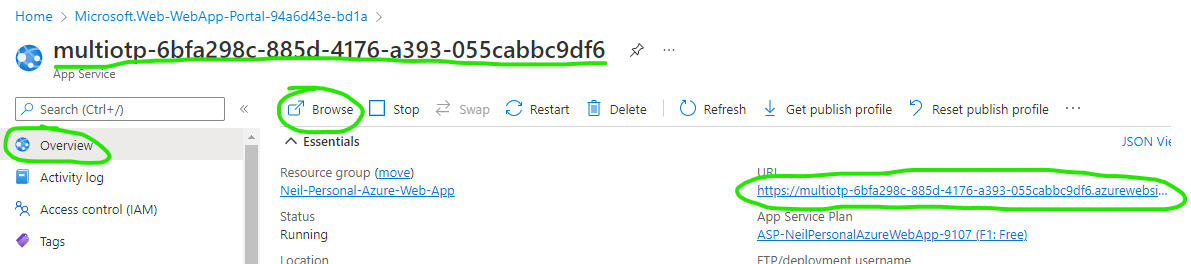
The multiOTP web interface should appear:
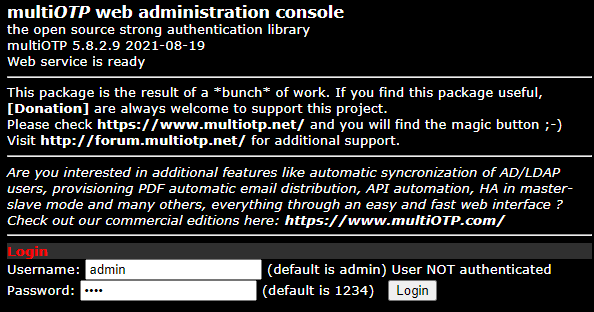
Login with the default username (admin) and password (1234), and immediately reset the admin password.
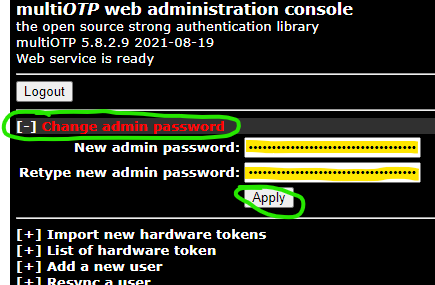
Once reset, you must log in again using the new admin password.
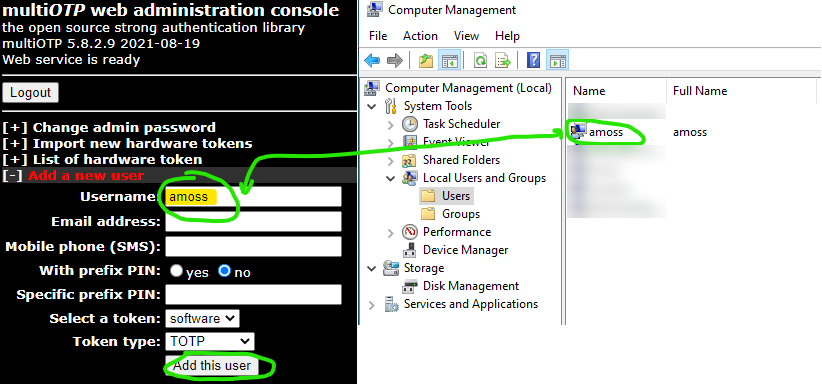
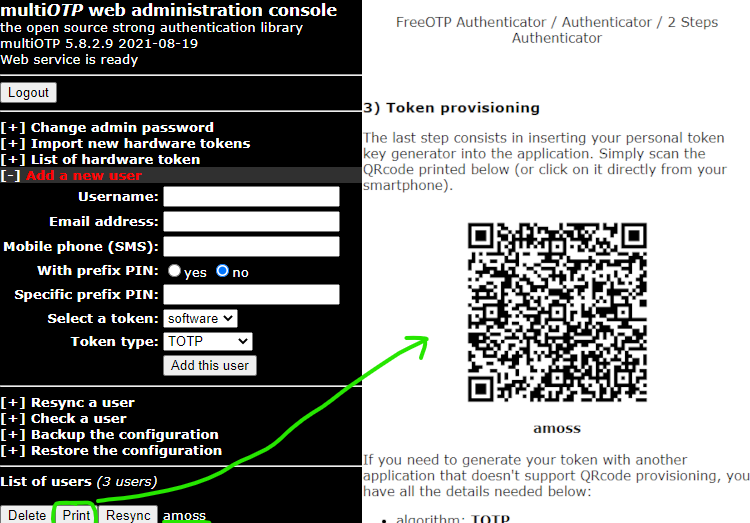
Next, add a user to multiOTP. For the limited scope of this post, the only requirement is that the multiOTP username matches the local or domain username of a user on the Windows device you want to secure with MFA.
Then, print the new user’s MFA (OATH-TOTP) enrollment information. Of particular interest is the QR code from step 3 (Token provisioning) - that TOTP credential must be scanned into an authenticator app (like Google Authenticator, Microsoft Authenticator, Duo Mobile, Authy, etc.).
Install the multiOTP credential provider and test
As the last step, install the multiOTP credential provider on the Windows device(s) you want to protect with multi-factor authentication. The credential provider installer is available in a standalone archive on the multiOTP credential provider page (near the bottom), but it is also bundled in the multiotp_w.x.y.z.zip file (credential-provider/multiOTPCredentialProvider-w.x.y.x.exe) downloaded previously.
Ensure your Windows device(s) have the latest x86 and x64 versions of Microsoft Visual C++ Redistributable for Visual Studio installed (see “PREREQUISITES” here).
Run the installer multiOTPCredentialProvider-w.x.y.x.exe, and when prompted, configure the credential provider as follows:
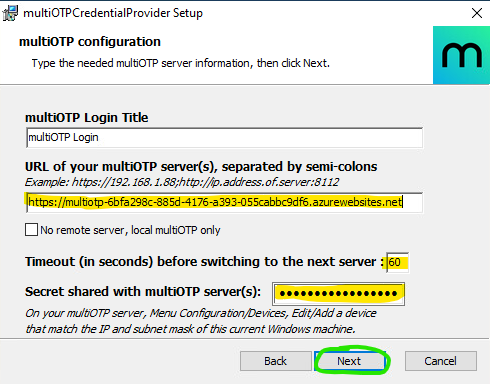
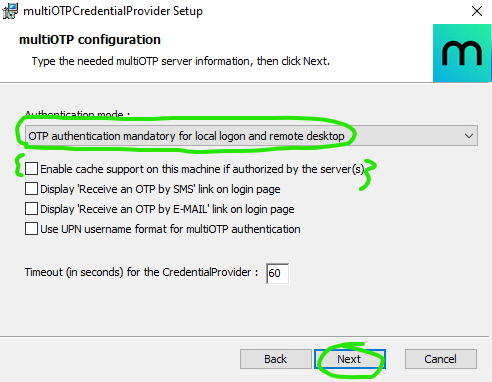
In brief:
- Ensure the credential provider points to your Azure App Service URL
- Set a relatively high timeout value (I used 60 seconds) to accommodate the Azure App Service “wake up” time (especially on the free/F1 plan)
- Specify the default shared secret of ClientServerSecret
- Set the authentication mode according to your needs (I used mandatory MFA for both RDP and console login)
- Disable local caching (if desired)
After installation, log out of Windows and log back in as the test user (with a username matching the one you created in multiOTP previously). After entering the username and password, the multiOTP TOTP passcode screen should appear:
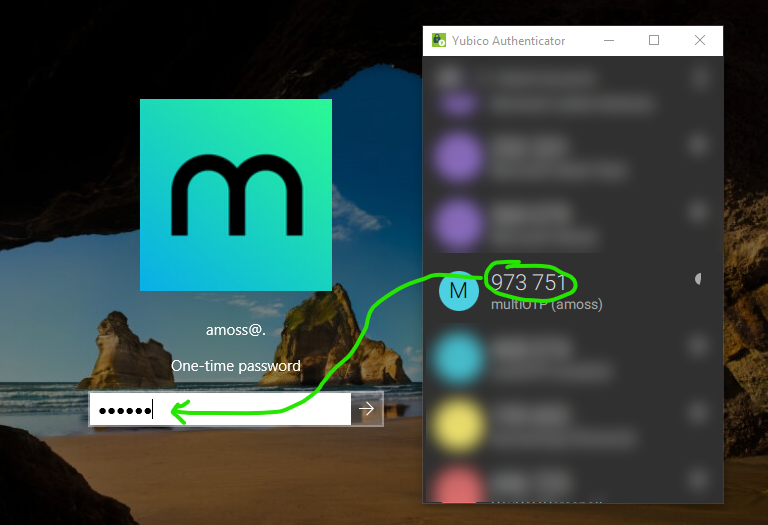
Enter the OTP for the user (displayed in your authenticator app), and you are logged into Windows.
Closing thoughts
I cut some corners and omitted details in this post, so a multiOTP server implementation on the free (F1) Azure App Service Plan is far from production-ready. But, with some additional hardening, configuration, and a paid App Service Plan, you can scale up your Azure-hosted multiOTP server to handle virtually any MFA workload. I hope this helps, and feel free to comment if you have thoughts, questions, or your own multiOTP/Azure App Service experiences to share.