The Shimano internal hub shifter (Nexus 3 with SL-3S42 bell crank) and roller brake (IM31-R) on my Street Rambler was a new configuration for me (I’ve dealt with standard bike tire changes regularly) and I was slightly concerned about removing and reattaching the cables and connectors for the hub shifter and rollerbrake (and having a functional outdoor elliptical afterward).
I was pleasantly surprised at how straightforward the process was and figured I would share. This post only covers back wheel removal and reassembly. You are on your own for the actual tire/tube replacement (once the rear wheel is removed).
If you dislike changing tires and want something that requires almost no maintenance, have a look at my post on outdoor elliptical bike flat proof (noflat, solid) tire options.
This elliptical is a “Street Rambler” or “StreetRambler” and NOT a “Street Strider.” The Rambler (from what I can tell) is a lower-end, non-branded version of the StreetStrider (and I suspect the components vary). It came from eBay for those interested.
First, gather the required tools (5mm hex key, 10mm combination wrench, 15mm combination wrench, combination pliers). You could likely get by without the pliers if you have 2 10mm wrenches or a decent Philips screw driver.
I also recommend reviewing the manual for the roller brake. Much to my chagrin, there is no quick cable release on this model. This missing feature did not complicate things much though.
Next, I propped the StreetRambler up on its front wheels (resting the elliptical on the ground, supporting itself with the arm bars) - I took care to place support under the left arm (the one with the brake lever) so the brake lever was not engaged against the ground during this project.
Shifter cable (bell crank - SL-3S42) removal
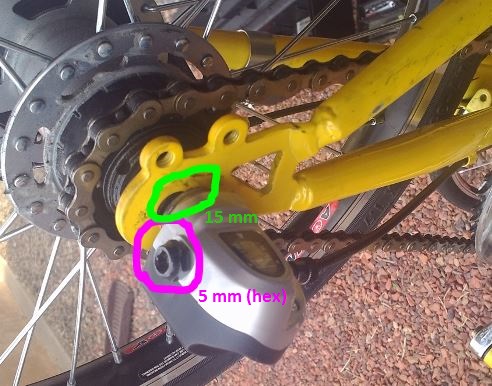
For a dose of self-confidence (a little research suggested this was an easy process), I removed the bell crank from the Nexus 3 hub. Shift the bike into 2nd (middle) gear, then loosen (do not remove) the 5mm bolt near the back of the bell crank and gently slide it off. Easy peasy.

Leave the 15 mm nut in place for now - we will return to that shortly.
Roller Brake (and cable) removal
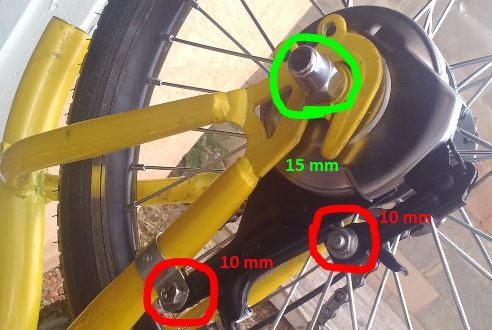
Next, I tacked the roller brake. To remove the cable, you must loosen the 10 mm nut on the brake link (no quick release). The cable feeds through a hole in the bolt. In the image below, I am referring to the nut toward the rear (right) of the assembly. No need to remove the nut entirely - just loosen it enough so the cable can be pulled out through the hole in the bolt to disconnect it. Once removed, the brake link will spring backward.
On to the brake arm and brake arm clip (fixes the brake arm to the frame - the bolt to the left in the image below). Although the bolt has a Philips head, I had no luck with that approach and used the 10 mm wrench and pliers to remove it. Once removed, the brake will spin freely with the rear wheel.

Wheel removal
Lastly, I loosened the 2 x 15 mm nuts on either side of the axel. Again, no need to remove them entirely - just loosen them enough that the rear wheel slides out of the frame (and hold onto it - the tension of the chain tends to pull it out quickly as soon as the nuts are loose enough.
Reassembly and conclusion
At this point, you are looking at a usual tire change. To re-assemble, do the reverse. Just a few basic pointers:
- When reattaching the brake cable, be sure to pull the brake link back into its original position before fixing the cable in place with the 10 mm nut. Once done, make sure the tension on the brake lever (on the handle bar) is correct (or to your liking) and that the brake works properly.
- When reattaching the bell , ensure you are still in second (middle) gear and line up the mark on the post between the 2 guide lines on the attachment. Tighten the 5 mm nut to fix the apparatus in position.
That is all. Certainly doable, albeit a little more time consuming than a usual bike tire change. If you have thoughts or other tips, please share.